DUC - Download Upload Center
User manual
Normal
user
Permission
- Download file
- Upload file
- Rename file
- Delete file
- Change your password (External user)
Description
1.
Login page
Go to DUC page via this link: http://duc.fabrinet.co.th/
Input username and password then click
Login button.
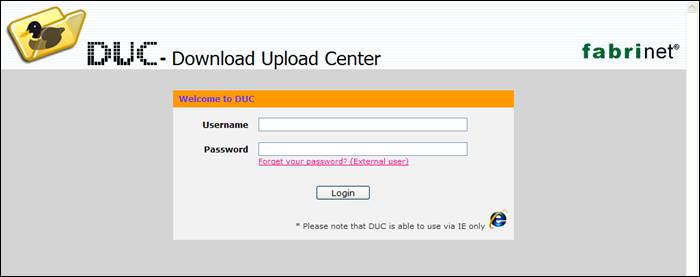
Picture 1: Login page
Note
1.1.
DUC
is able to user via IE only.
1.2.
If
you have input incorrect username or password. The Invalid authentication, Please try again. message will be shown.
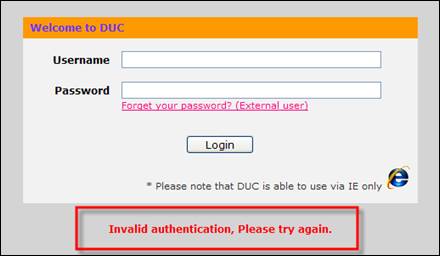
Picture 2: Invalid authentication message
1.3.
If
you have input incorrect password 3 times continually. The You have login fail 3 times continually. The system will disabled
your account. Please contact DUC Admin. message will be shown.
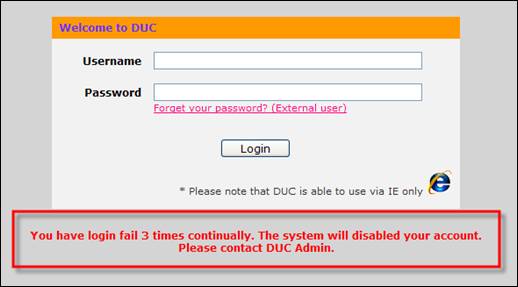
Picture 3: Login fail
message
1.4.
![]() If you forget your password please
click Forget your password? (External user) to go to Forget your password page.
Please see Forget your password section.
If you forget your password please
click Forget your password? (External user) to go to Forget your password page.
Please see Forget your password section.
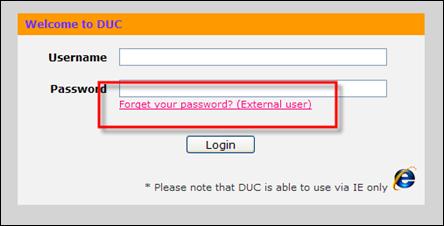
Picture 4: Forget you password?
2. Main page
If
verifying username and password pass, user will go to main page.
For example:
User
tester has permission in group Test_BU. The system will inherit his permission
to sub group so he can access all sub group in Test_BU (Group_A, Group_B) with
same as permission on Test_BU.
Picture 5: Main page
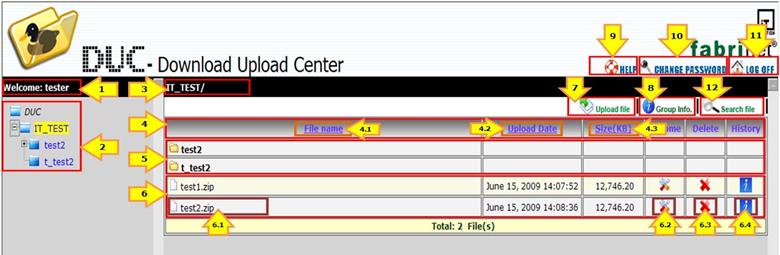
Description
2.1. ![]()
Display
welcome user name.
2.2. 
Display
list of groups. User can click at group name to go to this group. The highlight
yellow text is current active group.
2.3. ![]()
Display
current active group.
2.4. ![]()
Table
header, user can click File name, Update Date and Size column to sort files.
2.5. ![]()
Display
list of sub group(s) in active group. User can click in group name to go to
this group.
2.6. 
Display
list of file(s) in active group
2.6.1.
![]() Display File name:
Display File name:
·
When
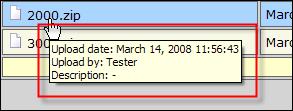
your mouse is over file name, an Upload date, Upload by and description
information of file will be popup.
·
When
you click on this file, you will go to download file. Please see Download file
section.
2.6.2.
![]() Click this picture to update file name.
Please see Update file section.
Click this picture to update file name.
Please see Update file section.
2.6.3.
![]() Click this picture to delete file. Please
see Delete file section.
Click this picture to delete file. Please
see Delete file section.
2.6.4.
![]() Click this picture to view file
information and history. Please see View file information section.
Click this picture to view file
information and history. Please see View file information section.
2.7. ![]() Click this picture to upload file. Please
see Upload file section.
Click this picture to upload file. Please
see Upload file section.
2.8. ![]() Click this picture to view group
information. Please see View group Information section.
Click this picture to view group
information. Please see View group Information section.
2.9. ![]() Click this picture if you want our help.
Please see Help section.
Click this picture if you want our help.
Please see Help section.
2.10.![]() Click this picture to change your
password (Only external user). Please see Change password section.
Click this picture to change your
password (Only external user). Please see Change password section.
2.11.![]() Click this picture to Log off from
DUC. Please see Change password section.
Click this picture to Log off from
DUC. Please see Change password section.
2.12.![]() Click this picture to Search file in
system, please see detail in Search file section.
Click this picture to Search file in
system, please see detail in Search file section.
3. Upload file
Click
![]() from Main page to go to upload file page.
from Main page to go to upload file page.
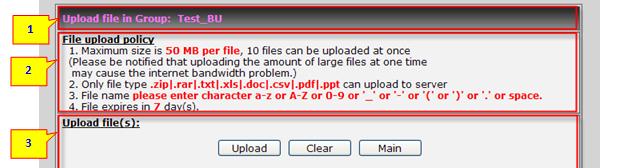
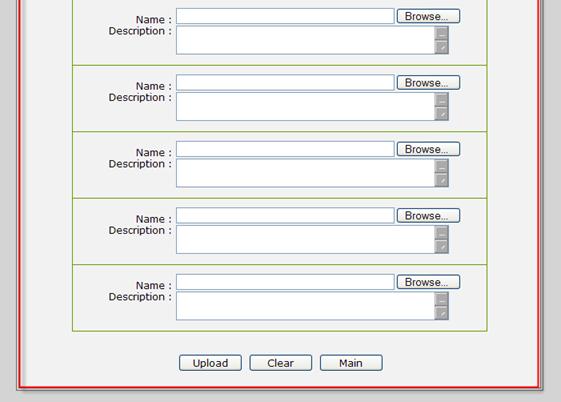
Picture 6: Upload file page
Upload
page has 3 parts:
3.1. Display group to upload.
3.2. Display file upload policy
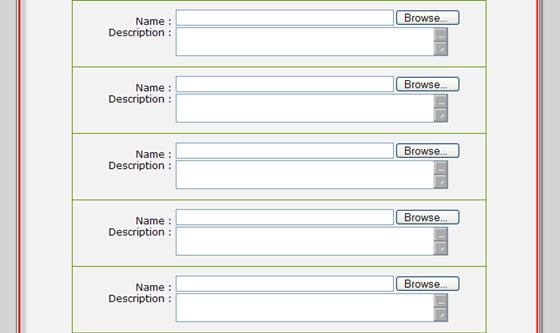
3.3. Upload file – user can upload 10 files
at once.
3.3.1. Click Browse button to select file.
3.3.2. Input Description of file (Optional).
3.3.3. Click Upload button to upload file.
For
example:
Upload 3 files:
test.zip, test.xls
and test.txt.
When
user complete selected file and click Upload button. The system will go to
Result upload file page.
Picture 7: Result upload
file(s)
3.3.3.1.
Click
More button to go to upload file again.
3.3.3.2.
Click
Main button to go to Main page.
3.3.4. Click Clear button to clear selected
file(s).
3.3.5. Click Main button to go to Main page.
When
you go to Main page you will see the uploaded file.
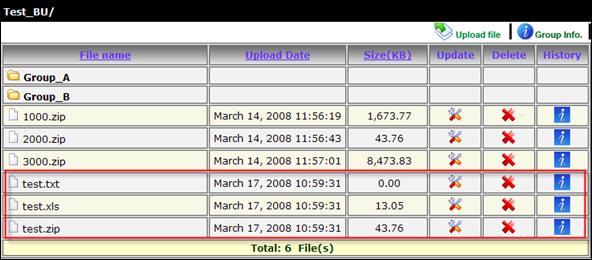
Picture 8: Main page
4. Download file
Click
on file name in list of files.

The
system wills popup download dialog to display the download file name and
confirm to Open/Save/Cancel file.
If
File download dialog doesn't appear please click here
to visit our troubleshooting.
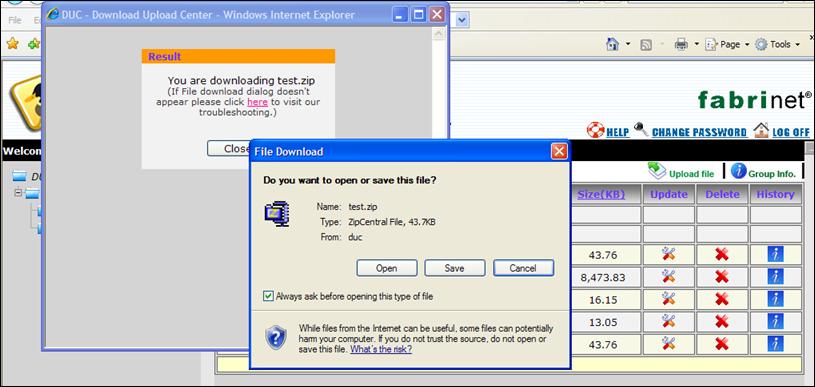
Picture 9: Download file dialog
5. Update file
Click
![]() the file name will can be update and then
click Update button to update file name. Or click Cancel to cancel update.
the file name will can be update and then
click Update button to update file name. Or click Cancel to cancel update.
For
example:
Click
update file name 1000.zip to 1000_upd.zip
5.1. Click ![]() at row of 1000.zip and input new file
name.
at row of 1000.zip and input new file
name.

Picture 10: Update file
5.2. After that click Update button. The
system will popup result window.

Picture 11: Result update file
5.3. Finally click OK button. The system
will go to Main page and show updated file name.
Picture 12: Show updated file name in Main page
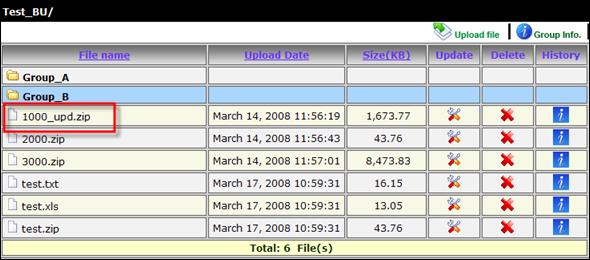
6. Delete file
Click
![]() picture to delete file.
picture to delete file.
For
example:
Click
delete file name 1000_upd.zip
6.1. Click ![]() at row of 1000_upd.zip. The system will
popup window to confirm delete file.
at row of 1000_upd.zip. The system will
popup window to confirm delete file.
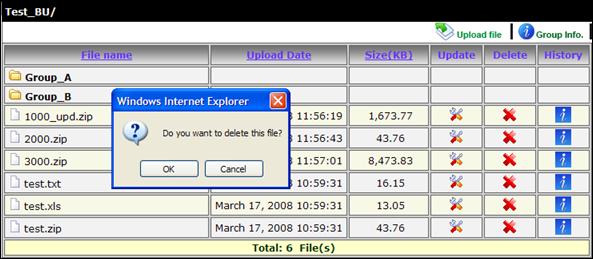
Picture 13: Confirm delete file
6.2. Then click OK button to confirm delete
file. Or click Cancel button to cancel delete file.
6.3. After click OK button. The system will
popup result window.
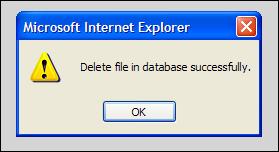
Picture 14: Result delete file
6.4. Finally click OK button. The system
will go to Main page and deleted file from system.
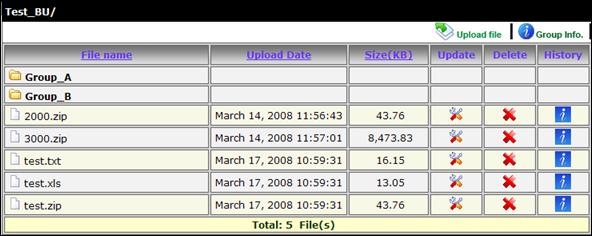
Picture 15: Main page
7. View file history
Click
![]() to go to History page.
to go to History page.
For example:
Click
![]() at row of test.zip
at row of test.zip
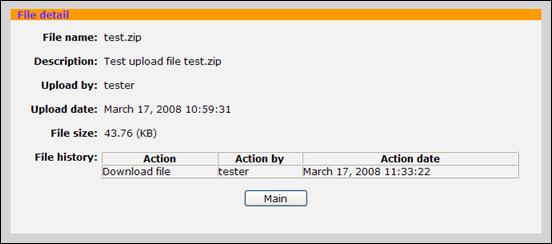
Picture 16: History page
File
information:
7.1. File name: selected file name.
7.2. Description: description of file.
7.3. Upload by: username that uploaded
file.
7.4. Upload date: date and time that was
uploaded.
7.5. File size: size of file display in KB.
7.6. File history: display action history
of file.
7.6.1. Action
7.6.2. Action by
7.6.3. Action date
Click
Main button to go to main page.
8. View Group Information
Click
![]() to view group information.
to view group information.
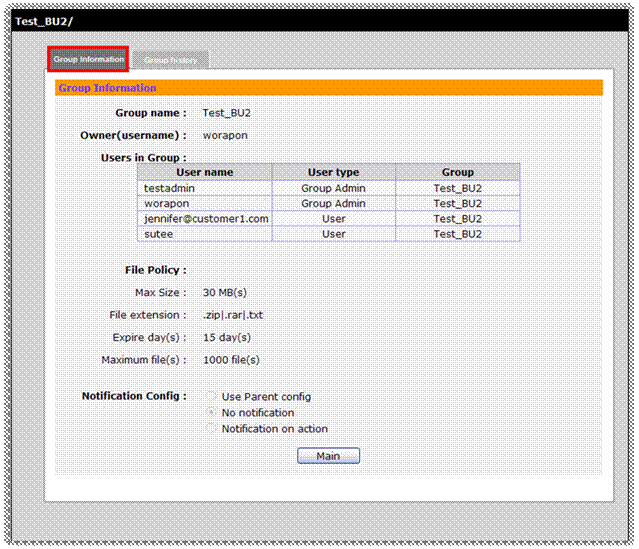
Picture 17: Group infomation page
On
Tab: Group information:
8.1. Group name: Current active group.
8.2. Owner: username that request to create
this group.
8.3. Users in Group: List all user(s) that
can access to this group
8.3.1.
User
name
8.3.2.
User
Type
8.3.3.
Group:
display group name that user have permission on it. Group will show the name of
most parent group that you have permission (i.e. Tester has permission on
Test_BU, Group_A and Group_B, Group will show Test_BU).
8.4. File Policy: The configure policy that
Group Admin had configured.
8.4.1.
Max
size: Maximum file size that can be uploading.
8.4.2.
File
extension: the extension file that allow to upload.
8.4.3.
Expire
day(s): the number of days that file can be stored in the system after that the
system will delete file from server automatic.
8.4.4.
Maximum
file(s): the number of file that can be stored in this group.
8.5. Notification config: show notification
that Group Admin had configured. It will display action and username.
Picture 18: Group infomation
page
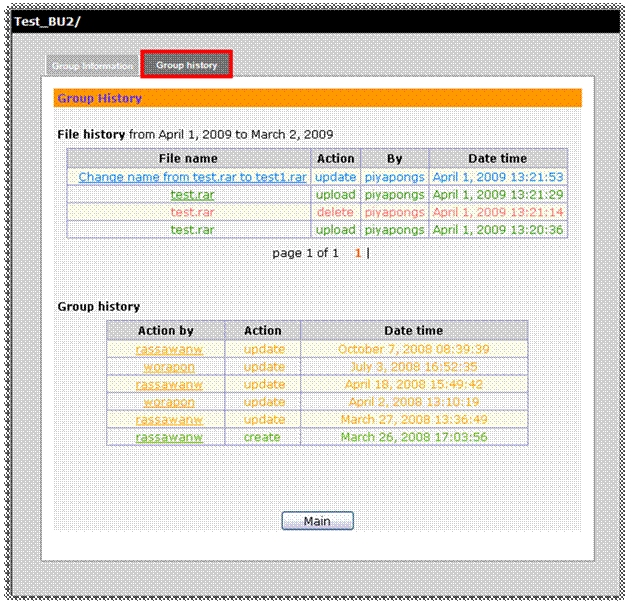
On
Tab: Group history:
8.6. File history: Show last 30 days file action
history on this group from today. If you want to see file detail, click on file
name. The System will show file detail dialog as following picture.
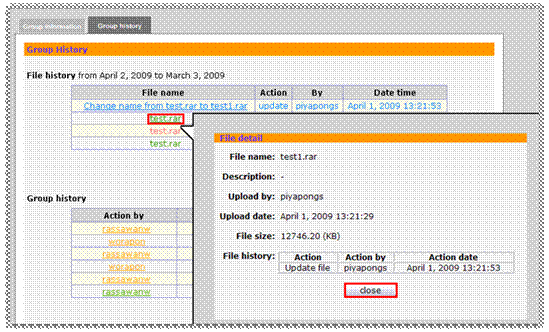
Picture 19: File detail page
8.7. Group history: Show creates and updates history on
group. Click on actor to see detail. The system will show dialog as picture
below.
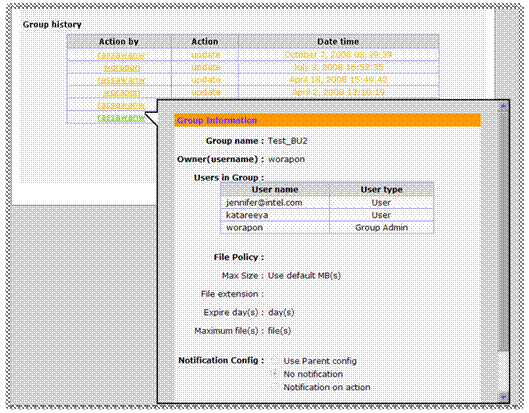
Picture 19:Group detail page
9. Help
Click
![]() to go to help page.
to go to help page.
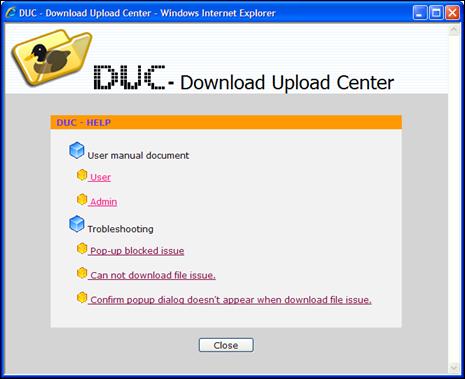
Picture 20: Help page
Help
page:
9.1. User manual document
9.1.1.
User:
Normal user document.
9.1.2.
Admin:
Group admin document.
9.2. Troubleshooting
9.2.1.
Pop-up
blocked issue.
9.2.2.
Cannot
download file issue.
9.2.3.
Confirm
popup dialog doesn’t appear when download file issue.
10. Change password
Click
![]() to go to change password page.
to go to change password page.
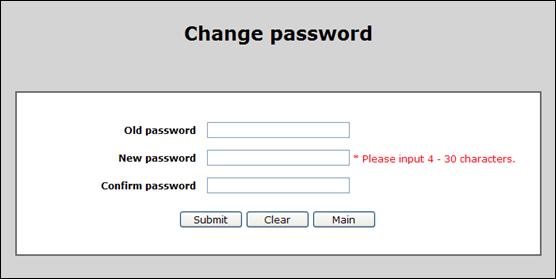
Picture 21: Change
password page
Input
data
10.1.Old password: input your old password.
10.2.New password: input your new password.
The password must input 4-30 characters.
10.3.Confirm password: input your new
password again.
10.4.Click Submit button to change your
password.
10.4.1. After click Submit button. The system
will popup result window.
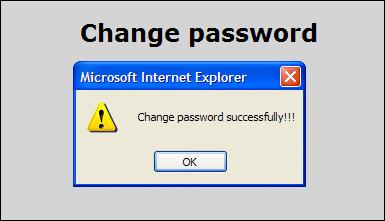
Picture 22: Result change password
10.4.2. Click OK button. The system will go to
Main page. And then login again the input password must be the new password.
10.5.Click Clear to clear all input data.
10.6.Click Main to go to Main page.
11. Forget your password
Click
Forget your password? (External user) in login page to go to Forget password
page.
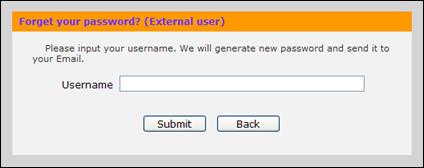
Picture 23: Forget your
password page
Please
input username then click Submit button. We will generate new password and send
it to your Email that had registered. Or click Back button if you want to go to
Login page.
12. Search file
Click
this picture ![]() to Search file in system.
to Search file in system.

Picture 24: Search file page
Input
data
1.
File
name: input keyword or
a part of file name, that you need to find and you can input * for any
characters.
Ex.
File test_file.txt, you can search with test*, *file, or *.txt.
2.
Search
in: default is search
on current group and all child groups under this group, on the picture current
group name IT_TEST
and
All groups is mean search on all groups, that you have permission to Download
and Upload file.
Click
on Search for search system will show like picture below.
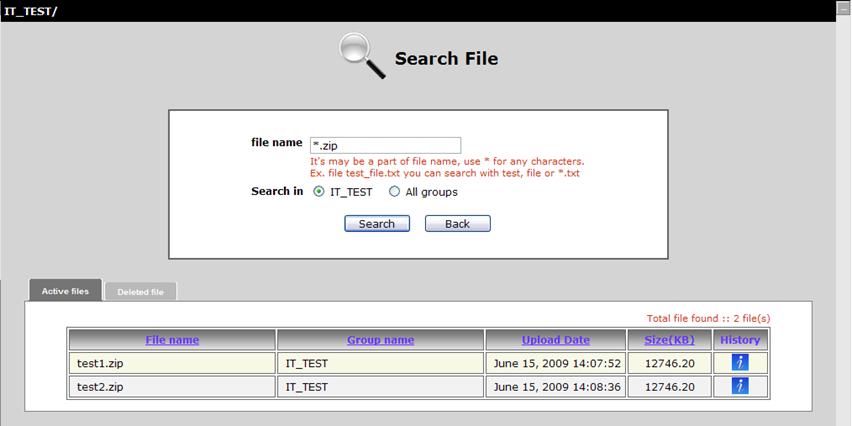
Picture 25: Search result – Active files
Default tab is Active files
this page shows list of current files in DUC, click on head table for sorting
and in the table click on file name for download file, on group name for go to
that group path and click on history for view file history page.
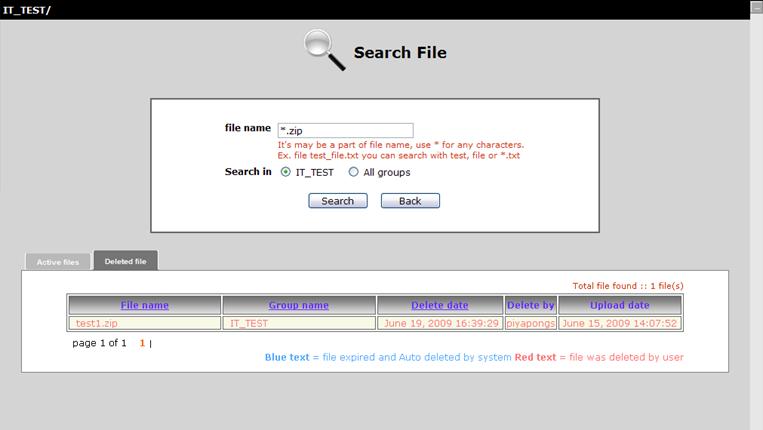
Picture 26: Search result – Deleted files
Deleted
files this page shows detail all deleted file on DUC, click on head table
for sorting.
13. Log OFF
Click
![]() to log out from DUC. The system will go
to Login page.
to log out from DUC. The system will go
to Login page.
Create by: Rassawan W (Ext.1126)
RassawanW@Fabrinet.co.th
Create date: July 18, 2007
Update date: March, 14, 2008
Update date: April 01, 2009
By PiyapongS.